You will need the following to complete this assignment:
****Need to add here.****
Please be sure to create a Google Doc that contains screenshots with captions indicating what you are accomplishing. This will be used to help show that you completed the project and can be used as a reference later on for you. This will also be your submission for this project. The number of screenshots is to be determined but typically it should match the page count of the project.
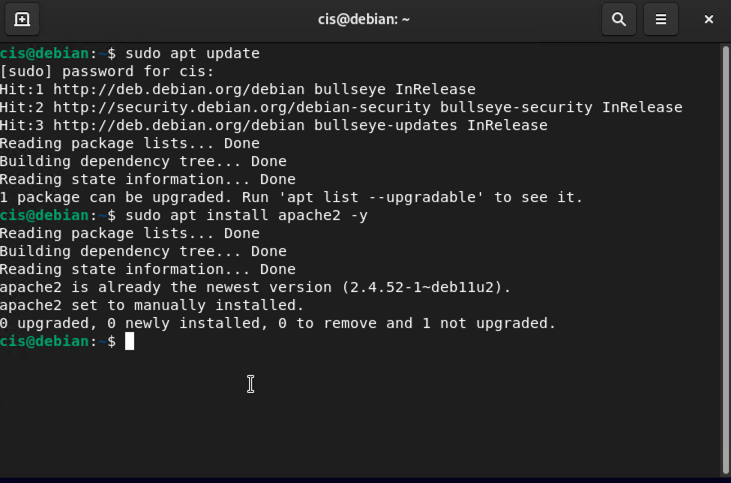
sudo apt update
sudo apt install apache2 -y
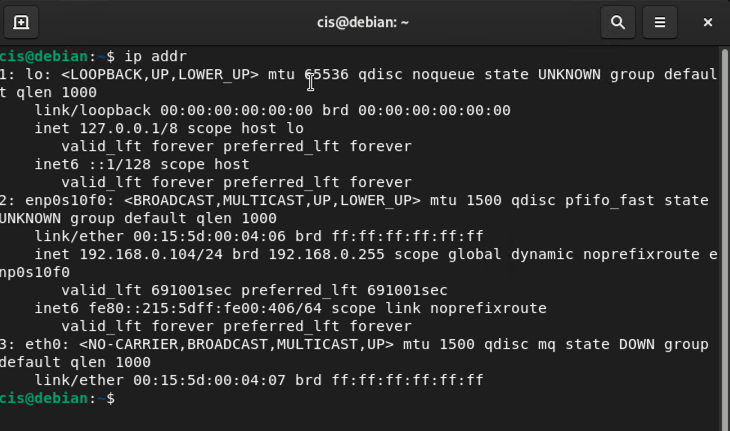
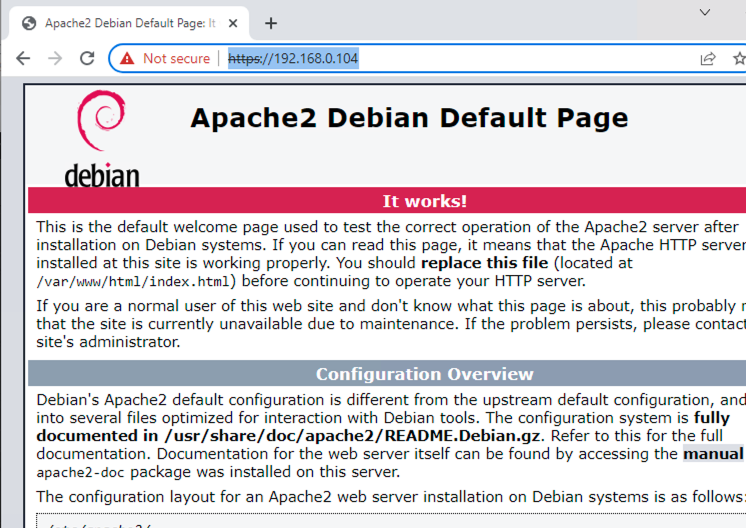
This will install Apache which is an open-source web server. Next in Debian, you need to find your IP address. Use the ip addr command shown below in a new window.
In your web browser on Server 2019 (the host system), enter that IP address. If your web server is running, you should be greeted by the following page:
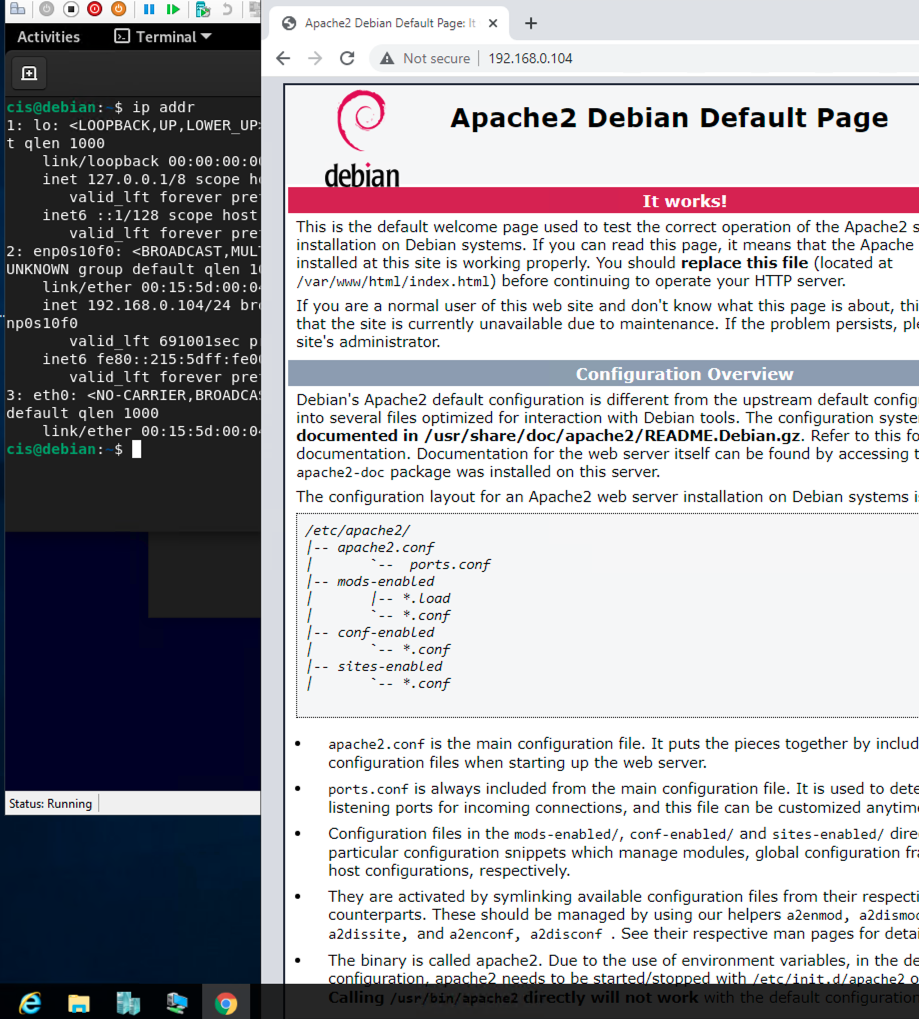
Take a screenshot showing your working Apache server. Use my screenshot for reference.
Since your Apache web server is working, we need to add some pages for reference. Switch back over to your Terminal session in Debian and enter the following which will create a new directory and add a new reference page:
sudo mkdir /var/www/html/securitypractice
sudo nano /var/www/html/securitypractice/index.html

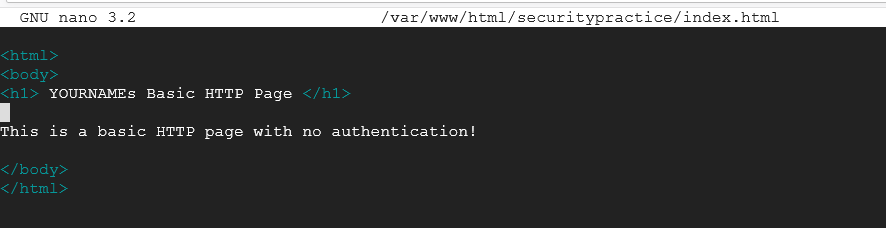
In the Nano text editor, you need to type in the following making sure to replace YOUR-NAME with your actual name.
<html>
<body>
<h1> YOURNAMEs Basic HTTP Page </h1>

This is a basic HTTP page with no authentication!

</body>
</html>
Take a screenshot showing your HTML code in Nano. Be sure to capture the directory. Use my image for reference.
Close the file by pressing Ctrl and x at the same time, type Y and press Enter to confirm the file name. Switch back over to your web browser that shows the default configuration page. At the end of your IP address add /securitypractice to the end of it and you should see the following page:
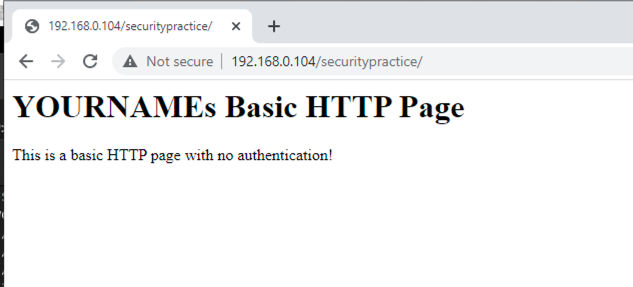
Take a screenshot showing your newly working web page. Again, use my image for reference.
Now let's add some basic authentication to our web page. The goal here is to make it where a user would have to enter in a username and password to access this page. In order to do this, we must access the directory that contains the authentication metrics. Type in the following on the Debian Linux Terminal window:
cd /etc/apache2/sites-enabled
ls

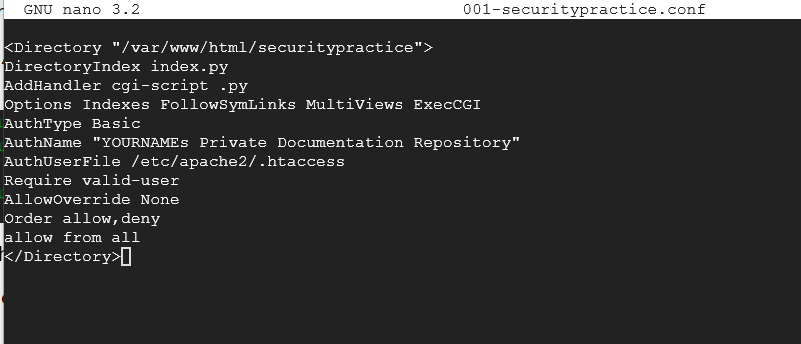
Now let's create the authentication page for the securitypractice directory.
sudo nano 001-securitypractice.conf
Type in the following again putting your name where YOURNAME is:
<Directory "/var/www/html/securitypractice">
DirectoryIndex index.py
AddHandler cgi-script .py
Options Indexes FollowSymLinks MultiViews ExecCGI
AuthType Basic
AuthName "YOURNAMEs Private Documentation Repository"
AuthUserFile /etc/apache2/.htaccess
Require valid-user
AllowOverride None
Order allow,deny
allow from all
</Directory>
Take a screenshot showing your HTML code in Nano. Be sure to capture the directory. Use my image for reference.
Close the file by pressing Ctrl and x at the same time, type Y and press Enter to confirm the file name. Type in ls to see your file, but it is not active. We will make it active in a moment, but we need to first add valid users as we stated in our previous code. Type in the following once again replacing YOURNAME with your name:
sudo htpasswd -c /etc/apache2/.htaccess YOURNAME
When prompted, type in password as your password. In a real scenario, you would make it more secure, but for the sake of simplicity, we will use the easy password. It will ask for it twice and will NOT show up when typing it in, so please make sure to type it correctly.

Please take a screenshot of this for proof of completion. Use mine for reference.
Now let's restart apache so that our configuration can take effect. Type in the following:
sudo service apache2 restart
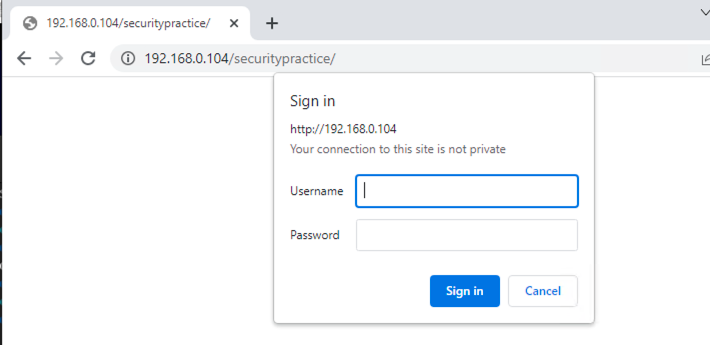
It's important to look for errors here. If any errors appear, please find the syntax error in your code. If no errors come up, you can proceed from here. Switch back over to your browser and refresh your /securitypractice page. You should be prompted with this new box:
Optional: Wireshark could be used to see the transmission of packets. You would need to refer to Project xx from 3840 for more details
To enter the website, provide it the credentials you created earlier. If it worked, you should see the following:

From here, this project can go two ways depending on what you want to accomplish. If you have a domain name (ie: proftsec.info like my course) available, you will follow one set of directions. Please keep in mind that domains AREN'T TYPICALLY FREE so there will be a cost for this if you want to do this. If you want to simply understand how SSL/TLS certificates work, you can create your own digitally signed certificates, but in the real world, since they aren't validated by a third party, there is no trust for these certificates which means that most browsers initially will flag your website as though it does not have encryption. The choice is yours.
Follow these directions if you are NOT going to use a domain. (FREE Method) (Self-sign certificates)
Before we begin, here is a special note about SSL/TLS certificates that are self-signed.
Note: A self-signed certificate will encrypt communication between your server and any clients. However, because it is not signed by any of the trusted certificate authorities included with web browsers, users cannot use the certificate to validate the identity of your server automatically. A self-signed certificate may be appropriate if you do not have a domain name associated with your server and for instances where an encrypted web interface is not user-facing. If you do have a domain name, in many cases it is better to use a CA-signed certificate.
On your Debian machine, we can create a self signed certificate that can be used to encrypt content to send to clients (web browsers as example). Issue the following command:
sudo openssl req -x509 -nodes -days 365 -newkey rsa:2048 -keyout /etc/ssl/private/apache-selfsigned.key -out /etc/ssl/certs/apache-selfsigned.crt
Let's breakdown the different part of the commands above:
- openssl- basic command to initiate OpenSSL, a tool for creating SSL certificates
- req- request command for creating an X.509 certificate which is the public key infrastructure standard for SSL/TLS
- x509- further specifies that we want a self-signed certificate instead of generating a certificate signing request (which would be the standard normal operating procedure)
- nodes- command that skips the option to use a password/passphrase to secure the certificate
- days 365- length of time for the certificate (in our case one year)
- newkey rsa:2048- command that requests a new key to be created that uses RSA as it's encryption standard and the key bit count of 2048
- keyout- directory of where to place the private key that was created
- out- directory of where the created certificate is placed
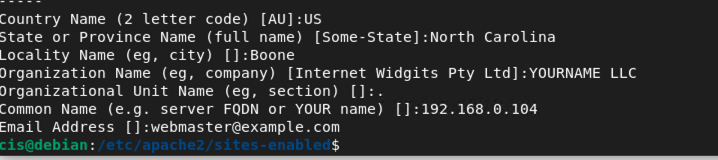
On the prompts, fill them out with the following again replacing YOURNAME with your actual name:
(Please note that you could put in your email address if you wanted to but not required. If it were a geniune website, you would need a point-of-contact in which the email address would need to be valid should anyone need to get in touch with you about your website)
- Country Name: US
- State or Providence Name: North Carolina
- Locality Name: Boone
- Organization Name: YOURNAME LLC
- Organization Unit Name:.
- Common Name: USE YOUR DEBIAN HERE
- Email Address: [email protected]
Please take a screenshot of this for proof of completion. Use mine for reference.
Note that these files are saved in the /etc/ssl directory. Now we need to create/modify an Apache configuration file to handle them. Enter the following command to begin this:
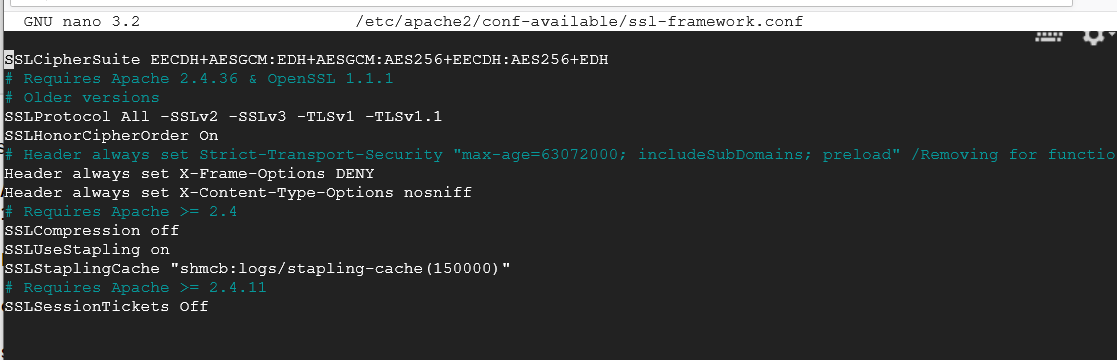
sudo nano /etc/apache2/conf-available/ssl-framework.conf

In our Nano file, we can modify what is shown on the Strong ciphers for different web servers under the Apache listing. See below for the image from the website:

For the sake of simplicity and compatibility, we will disable the HSTS portion of the code shown by commenting it out. We will also clean up the code for ciphers that are supported.
SSLCipherSuite EECDH+AESGCM:EDH+AESGCM:AES256+EECDH:AES256+EDH
# Requires Apache 2.4.36 & OpenSSL 1.1.1
# Older versions
SSLProtocol All -SSLv2 -SSLv3 -TLSv1 -TLSv1.1
SSLHonorCipherOrder On
# Header always set Strict-Transport-Security "max-age=63072000; includeSubDomains; preload" /Removing for functionality/compatibility issues/
Header always set X-Frame-Options DENY
Header always set X-Content-Type-Options nosniff
# Requires Apache >= 2.4
SSLCompression off
SSLUseStapling on
SSLStaplingCache "shmcb:logs/stapling-cache(150000)"
# Requires Apache >= 2.4.11
SSLSessionTickets Off
Close the file by pressing Ctrl and x at the same time, type Y and press Enter to confirm the file name. Now we have to modify the default SSL host file. It is always a good idea to make a backup of your original file in the event you break the SSL connections to the website! Do this by entering the following:
sudo cp /etc/apache2/sites-available/default-ssl.conf /etc/apache2/sites-available/default-ssl.conf.bak
Once you have done this, you can modify the original SSL comfiguration file. There will be a handful of changes needed to be done:
sudo nano /etc/apache2/sites-available/default-ssl.conf
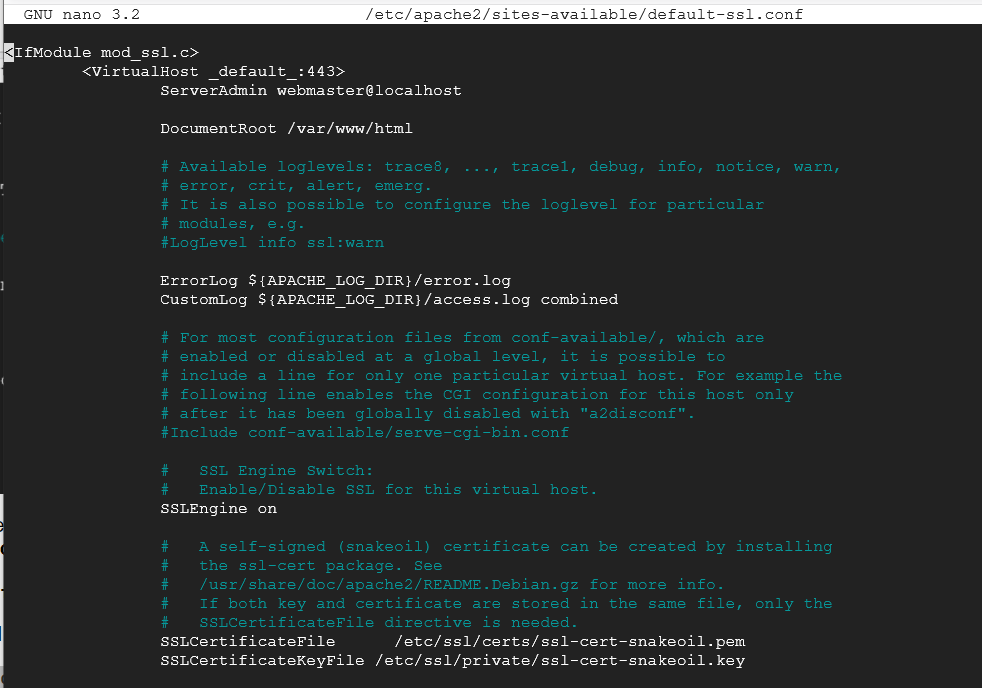
In the image above is the default configuration. Refer to my image below for what to change in the file:
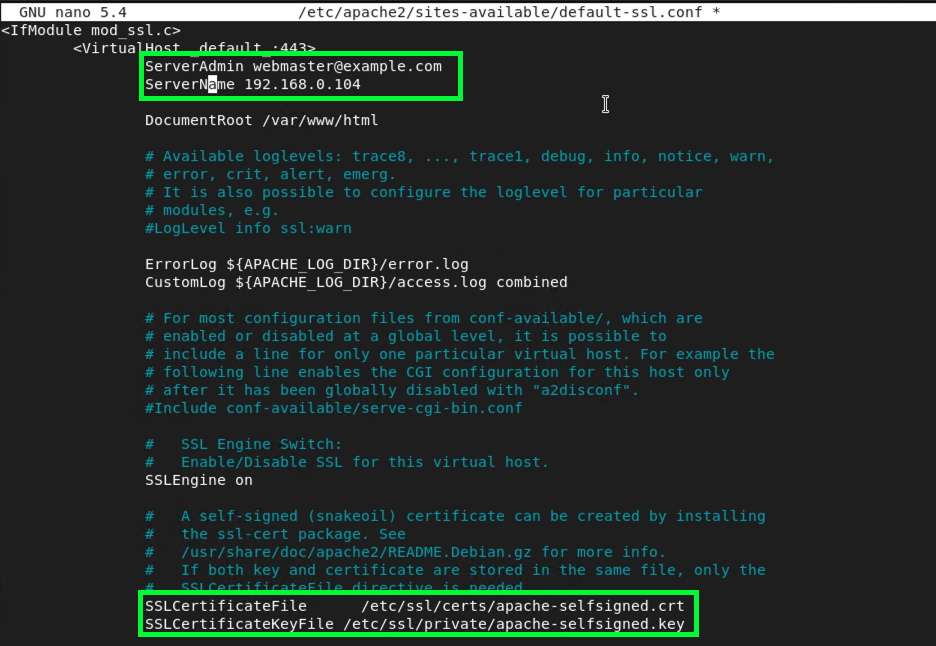
As you can see in my image, I changed the email address to match the email address on the certificate. I also added the field name of ServerName with my Debian IP address and changed the locations to match where the SSL Certificate and Public Key file reside. Now everything should be in order for your website to run HTTPS.
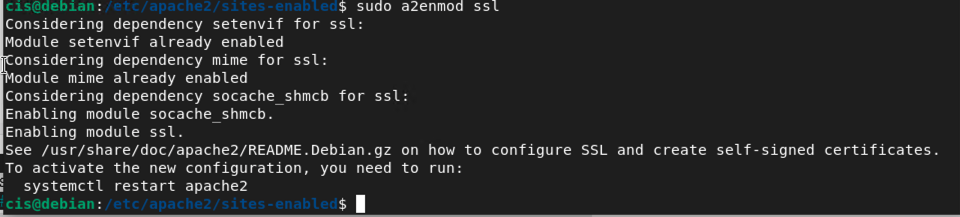
Now we are in the homestretch of this project. We need to enable SSL on both Apache and our Google Cloud Platform followed by restarting Apache to put these changes into effect. Let's begin by enabling SSL. Please do these commands one line at time.
sudo a2enmod ssl
sudo a2enmod headers
sudo a2ensite default-ssl
sudo a2enconf ssl-framework
sudo apache2ctl configtest


If you get all of the above screenshots, then your syntax is good and you can proceed. Please note the reliability shown above is more than likely as a result of an internal IP address shown.
sudo systemctl restart apache2
Please take a screenshot of this for proof of completion. Use mine for reference.
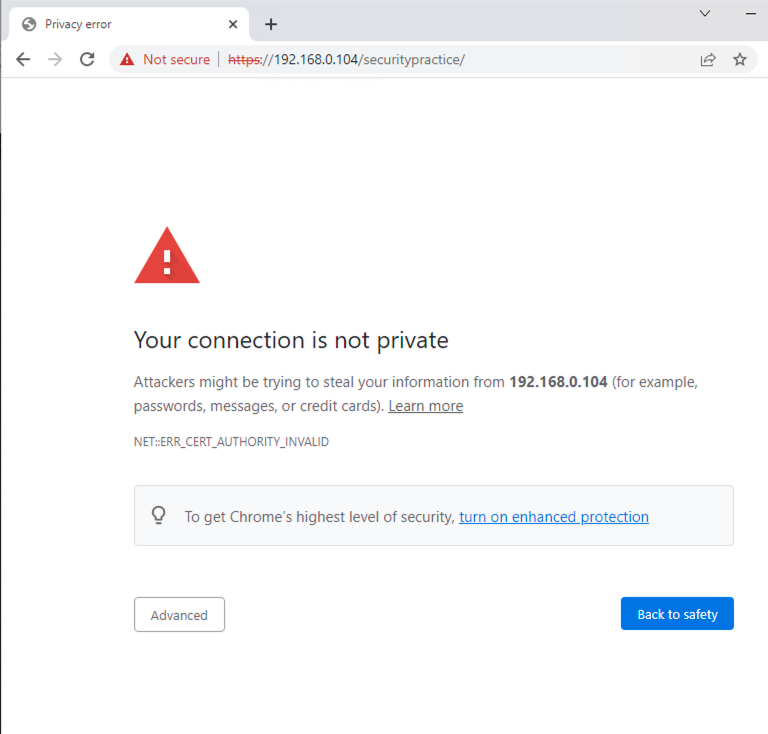
This scary window is perfectly normal in this situation. As explained before, your certificate is self-signed, therefore it is not validated by a third-party for authenticity. Click on Advanced...
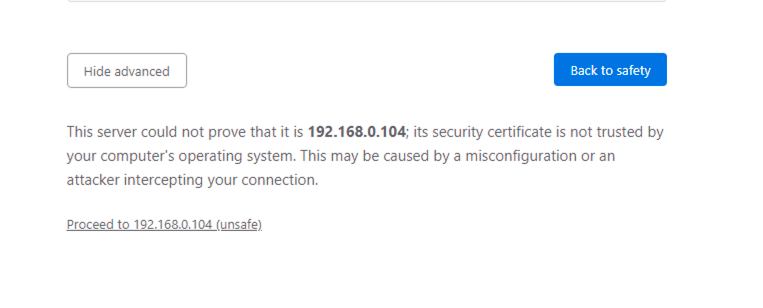
As you can see from the image above, it's a self-signed certificate, hence the warning. You could click on View Certificate and compare it with what you created earlier.
Take a screenshot of your certificate. Show details like Organization name and validity in your screenshot.
Click on Accept this risk and continue or Proceed to.. to get your page to load. See below to show that it is running with HTTPS.
From here, proceed to your securitypractice directory in the web browser? What happens?
Take several screenshots showing what happens when you proceed to your securitypractice directory. Is it protected with HTTPS? If not, what do you need to empty in your web browser to make it work? If I haven't added the section on redirects, how would you accomplish this? Please briefly describe it (required) and attempt to do it (optional).
For those interested in using an actual domain, refer to this website for directions on how to use Lets Encrypt: Securing Apache with Let's Encrypt
This concludes this project. PLEASE MAKE SURE YOU ARE SHUTTING DOWN YOUR VM EACH TIME UNLESS YOU ARE LEAVING IT RUNNING FOR A TASK IN THE COURSE.
Please make sure to submit your project as instructed by your instructor by it's due date and time.
Based on a project from a previous year, updated for HTML use in February 2020
Updated for 2022 for Debian 11
References
How to install LAMP stack on Debian 10
Creating a Self-Signed Certificate on Debian 10
Strong ciphers for different web servers
Securing Apache with Let's Encrypt