Expectations
After this project, you have a basic understanding of how you can quickly create a security tool and be familiar with Go, the programming language.Please be sure to create a Google Doc that contains screenshots with captions indicating what you are accomplishing. This will be used to help show that you completed the project and can be used as a reference later on for you. This will also be your submission for this project. The number of screenshots is to be determined but typically it should match the page count of the project.
Directions
Go to Google Cloud and boot up your Debian VM. Once you are a Terminal session, enter the following:
	sudo apt update
	sudo apt install curl -y
While this is occurring, on your host computer (local system) open the following website:
https://golang.org/dl
From here find the latest version of Linux (64-bit version). See below for current website:
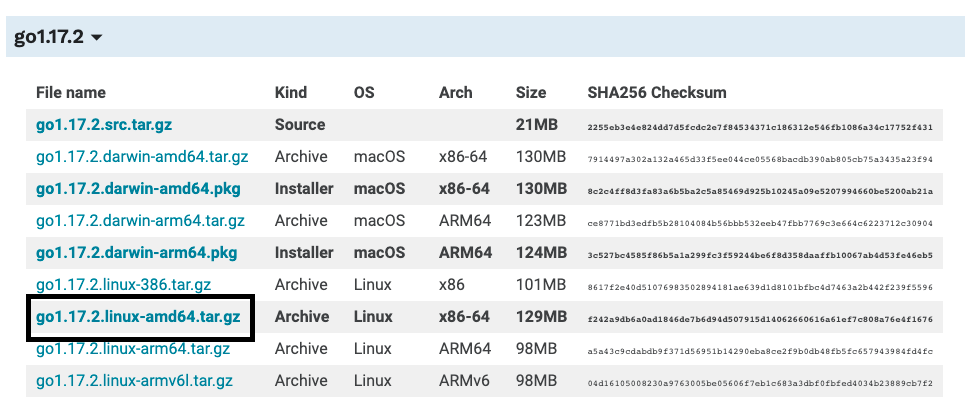
Note the SHA256 checksum on the right. Remember, you can use this to verify that a file is the correct file due to its unique signature hash.
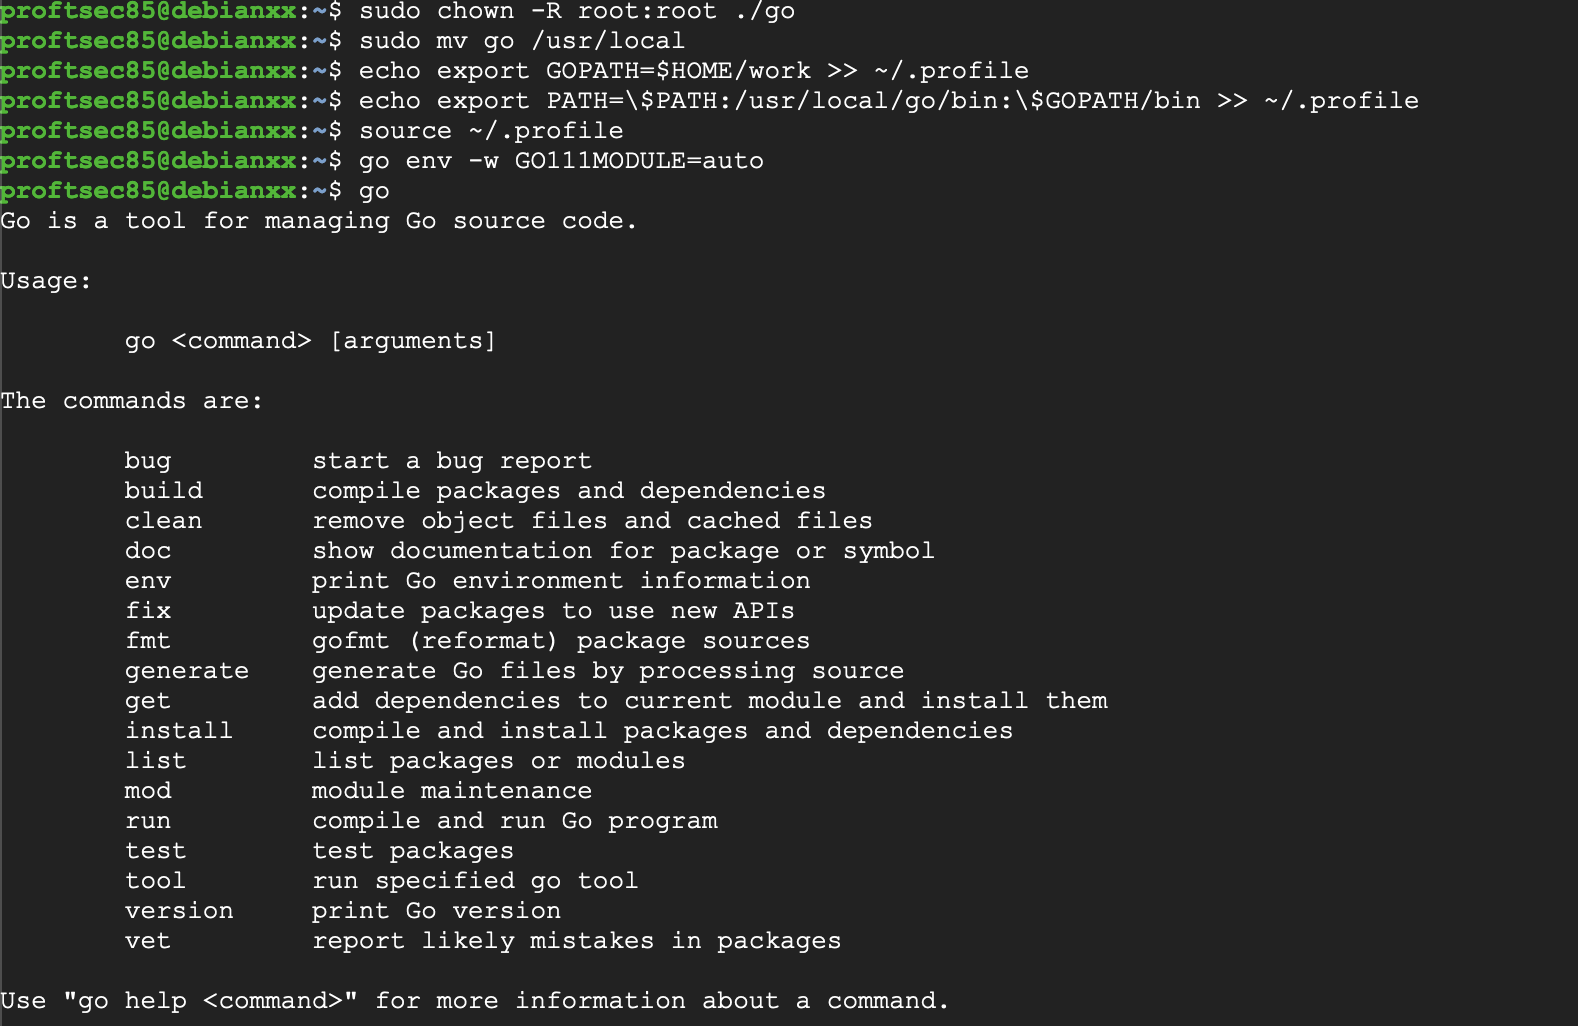
From here, go back to your Debian server and enter the following commands (adjust if necessary depending on the name and version)
You should see the same results below which will validate that you have downloaded the correct file.curl -O https://dl.google.com/go/go1.17.2.linux-amd64.tar.gz sha256sum go1.17.2.linux-amd64.tar.gz

Take a screenshot of your system showing your matching checksum for the file you downloaded
Back on your Debian VM, execute these commands (again adjust file names where necessary):
Again, your results should be shown below. All packages should install with no errors.tar xvf go1.17.2.linux-amd64.tar.gz sudo chown -R root:root ./go sudo mv go /usr/local echo export GOPATH=$HOME/work >> ~/.profile echo export PATH=\$PATH:/usr/local/go/bin:\$GOPATH/bin >> ~/.profile source ~/.profile go env -w GO111MODULE=auto go
Now comes the time that every programmer enjoys, the "fun" first program of Hello World. On your Debian system, we are going to make a folder for your Go program to launch from. Additionally, we are gathering the source requirements from Go. Enter the following commands:
	go env -w GO111MODULE=auto
	mkdir $HOME/work
	mkdir -p work/src/my_project/hello
	nano ~/work/src/my_project/hello/hello.go
In nano, type the following to get your first program ready to 'go'
	package main

	import "fmt"

	func main() {
		fmt.Printf("Hello, World!\n")
	}
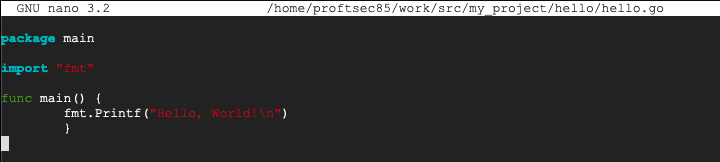
Above is the code shown in Nano. Type in Ctrl X, Y and press Enter. Execute these next commands to compile the program and run it.
	go install my_project/hello
	hello

To test your abilities, make a new project with the name of the folder being cis3840 and make the program print your first and last name followed by today's date on a new line under it. Take a screenshot of your newly created folder name, your code, and the output.
See my example below for what it's supposed to look like when it runs:

Now it's time to build a portscanner, which is a common tool that security practioners use to scan for open, filtered, and closed ports on a network. On the Debian Terminal prompt, issue the following commands:
	mkdir -p work/src/my_project/portscan1
	nano ~/work/src/my_project/portscan1/portscan1.go
In Nano, copy this code for the initial portscanner:
package main

import (
   "net"
   "fmt"
   "strconv"
)

func main() {

   for i := 1; i < 65535; i++ {
      port := strconv.FormatInt(int64(i), 10)
      conn, err := net.Dial("tcp", "127.0.0.1:" + port)
      if err == nil {
         fmt.Println("Port",i, "open")
         conn.Close()
      }
   }
}
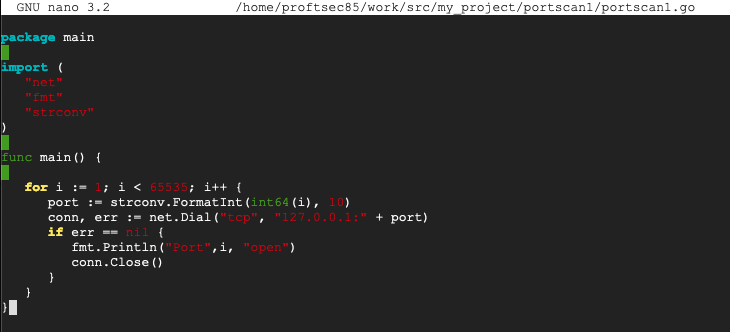
Above is the code shown in Nano. Type in Ctrl X, Y and press Enter to save it.
As before, we need to install it to make it run, so enter the following:
As you can see in the example below, port 22 (ssh), which we used to make this connection is the only open port currently.go install my_project/portscan1 portscan1

Let's turn this into a more practical application. Knowing which ports are open is fine, but let's grab the banner associated with the port. A banner provides us information about what particular service is running on that port. On the Debian prompt, enter the following:
	mkdir -p work/src/my_project/portscan2
	nano ~/work/src/my_project/portscan2/portscan2.go
In Nano, copy this code for the initial portscanner:
package main

import (
   "net"
   "fmt"
   "strconv"
)

func main() {

   for i := 20; i < 25; i++ {
      port := strconv.FormatInt(int64(i), 10)
      conn, err := net.Dial("tcp", "127.0.0.1:" + port)
      fmt.Println("Scanning Port",i)
      if err == nil {
         fmt.Println("Port",i, "open")
       	 Buffer := make([]byte, 1024)
		 numBytesRead, err := conn.Read(Buffer)
		 if err == nil {
            fmt.Printf("Banner: %s\n", Buffer[0:numBytesRead])
		 }
         conn.Close()
      }
   }
}
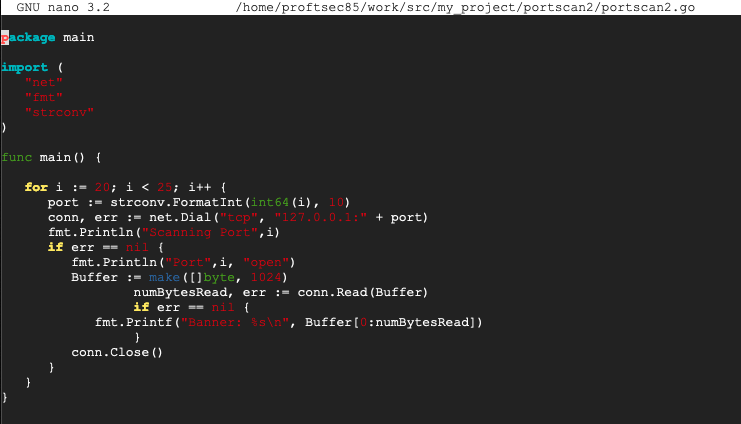
Above is the code shown in Nano. Type in Ctrl X, Y and press Enter to save it.
As before, we need to install it to make it run, so enter the following:
As you can see, you now have a banner showing information about the service running on the port number.go install my_project/portscan2 portscan2

In the previous code, it only ran through the first 24 ports. Let's move the needle a little and try some different ports.
More to be added...
Please submit your work by the due date and time as provided by your instructor.
New for Fall 2021 (10/27/2021)
References
I Spy Code- Go- Port Scanner