You will need the following to complete this assignment:
****Need to add here.****
Please be sure to create a Google Doc that contains screenshots with captions indicating what you are accomplishing. This will be used to help show that you completed the project and can be used as a reference later on for you. This will also be your submission for this project. The number of screenshots is to be determined but typically it should match the page count of the project.
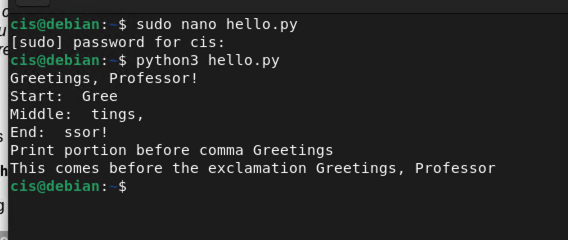
sudo nano hello.py
Enter the following code:
hello= "Greetings, Professor!"
print (hello)

print("Start: ", hello[0:4])
print("Middle: ", hello[4:10])
print("End: ", hello[-5:])

a = hello.find(",")
b = hello.find("!")

print("Print portion before comma", hello[:a])

print("This comes before the exclamation", hello[:b])
Now save your file by pressing Ctrl+X, followed by a Y (for yes to save the modified buffer) and press Enter (to write to the file name hello.py).
In order to run the program, type python3 hello.py
As you can see from the image above, you are learning how to slice different portions of data. You are also learning how to look for data within the strings as well. What slicing means is to cut out the data points you are looking for. In my example above, our first variable "hello" is being sliced to remove certain strings at certain points. The first entry in our array referred to as 0 (or position 0) is 'G' in our variable. The second which would be 1 is 'r' and so on. Using negative numbers means to start at the end of the string and count backwards. If you need further explaination, please check out this website: Python Strings Help
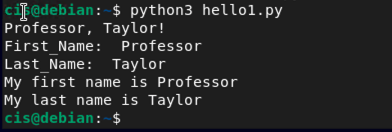
For proof of understanding, create a new file called hello1.py. In this file, declare variables using the slicing techniques shown above. Have the file print your first and last name using the field names of FirstName and LastName. Make sure that you have a comma between your first and last name followed by an exclaimation point at the end!Here is my output for reference. Make sure you show both your code and the output in your screenshots.
Next up are loops. In Terminal, let's create a new file called loopy.py In the nano editor, type in the following:
for i in range(5):
	print(i)
print()
for y in "YOSEF":
	print(y)
Now save your file by pressing Ctrl+X, followed by a Y (for yes to save the modified buffer) and press Enter (to write to the file name loopy.py).
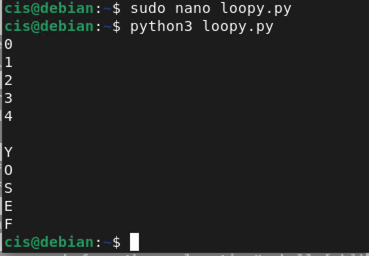
Some items to note about loops are as follows.
As before, if you need more explanations, here is a great resource: Python3 Loops Help
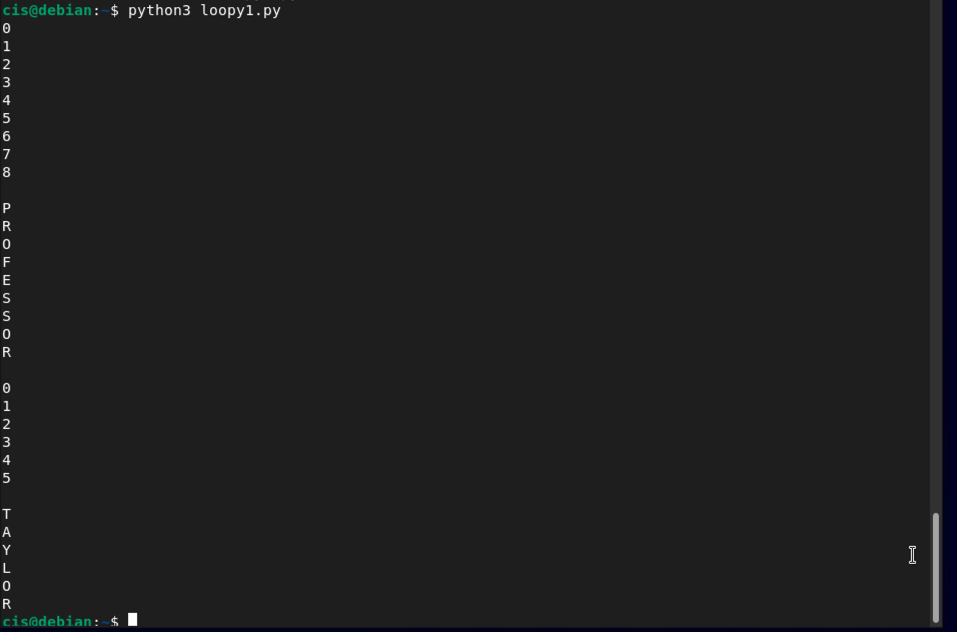
For proof of completion, create a new file called loopy1.py and have this file do a loop of your first and last name. Use my example from above. Take a screenshot of both your code and your output. Use my output for reference.
Now onto encoding techniques. As you may recall from our previous projects, encoding techniques are what are responsible for taking bytes of information and displaying them in a readable format. We've discussed ASCII at great length AscII reference. If you recall, the capital letter 'A' is 41 in Hexadecimal. It is represented as x41 or 0x41. The problem with ASCII is the limitation of the number of characters it can express. As we adopt more languages in the world, emojis become more the norm, we have to find ways to represent these characters. Enter Unicode a new style of encoding that can use over 1 million entries (theoractically).
To futher elaborate, ASCII encodes data as one byte per character and is something that has been in existance for over 60 years. ASCII is limited in terms of printable characters to 128 total (0-127, refer to the link that shows the table). The additional characters are not printable but can be used to store arbitrary data. See below for an image that shows the hex/decimal values and what the AscII character would be.
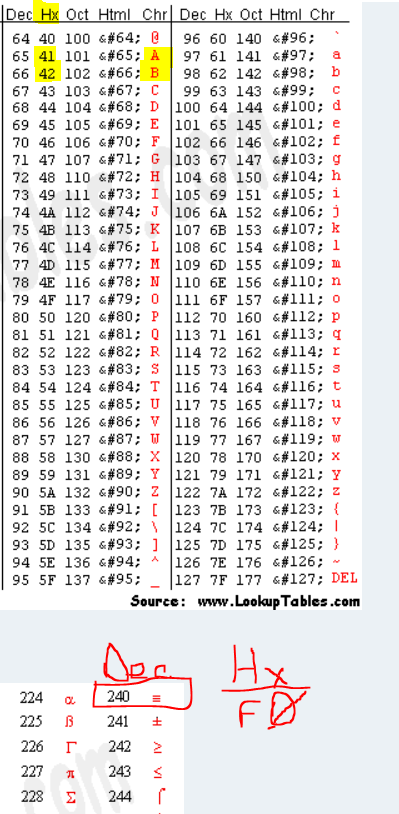
As you can see, the hex value for 'A' is x41, the hex value for 'B' is x42, and the three equals sign (looks very similar to navigation menu) has no hex value but a decimal value of 240. But decimal can be converted to hex so 240 is F0 or xF0. Let's see this in Python2 for context.
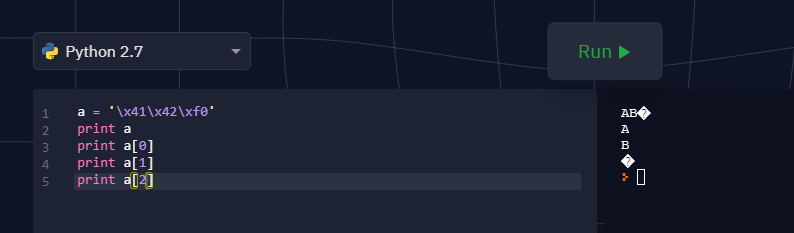
As you can see, ASCII cannot display decimal character 240. You can also see that Python2 stored data one byte at a time. Now, let's see how Python3 does it differently. Type in the following to get into interpreter mode:
python3
Now let's take my example from earlier but see how Python3 with unicode interprets the bytes of information:
a = '\x41\x42\xf0'
a
a[0]
a[1]
a[2]
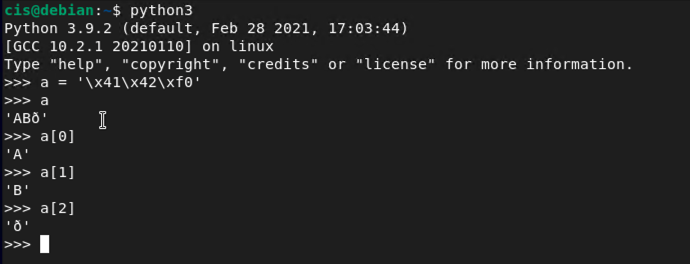
As you can see, that third character is now a printable character, but not found in the English alphabet. Since this is just a raw input (strings), let's see what happens when we actually encode something.
b = a.encode()
b
hex(b[0])
hex(b[1])
hex(b[2])
hex(b[3])

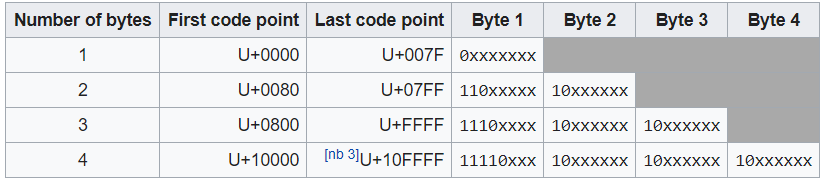
That's odd. When encoded in Unicode, there are 4 bytes instead of 3. Notice that the last bytes aren't 'f0'. Let's look into this. Unicode uses UTF-8 as it's encoding mechanism instead of ASCII. As previously mentioned, UTF-8 in Unicode has over a million different possibilities. The reason for this, is how Unicode stores bytes when encoding. Unicode uses what are called 'Code-Points' to attempt to encode Unicode characters in a single byte (where applicable like ASCII) and then where it's not, it attempts to take the binary digits and encode them as a series of bytes. As an with our example, the first two bytes are ASCII characters, so those are encoded as if they were ASCII characters. Since any value after 127 is considered non-printable by ASCII, Unicode uses UTF-8 to encode 2 bytes at once. The first byte is oftened referred to as the 'count' byte since this indicates the number of bytes for 'code-point'.
Here is a breakdown of the values.
| Decimal | Hexadecimal | Binary | Unicode | Character |
|---|---|---|---|---|
| 65 | x41 | 0100 0001 | U+0041 | A |
| 66 | x42 | 0100 0010 | U+0042 | B |
| 240 | xc3\xb0 | '1100 0011' '1011 0000' | U+00F0 | ð |
As you can see, the third entry has two bytes and the first byte begins with '110xxxxx' which with the two leading '1's' indicates 2 bytes in a sequence which includes the count byte. Bytes that begin with '10' are data bytes and contain information for the code point. Below is an image for how UTF-8 encodes byte sequences.
For additional information, see this link where you can find more information UTF-8 from Wikipedia. Now let's try some interpreter mode syntax. Enter the following:
'\U00000041'
'\U00000042'
'\U000000F0'
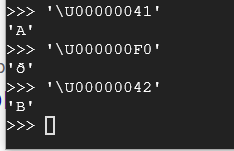
Time to a challenge. Complete the questions below.
Take a screenshot showing each of the following Unicode eight-character code points for the following with the object requested in picture as well:
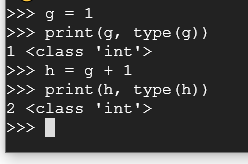
Now let's turn our attention to more data types to see how Python3 handles those. First, let's look at integers.
g = 1
print(g, type(g))
h = g + 1
print(j, type(j))
As we can see below, our objects are integers (int) so we can use mathematical operators on them.
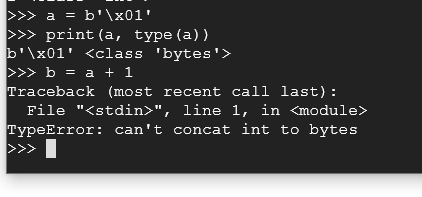
Let's dig deeper into this. Try these commands:
a = b'\x01'
print(a, type(a))
b = a + 1
As you have just witnessed, you cannot concatenate two different field types (int and byte). However, we can convert our bytes into integers, combine them, and then convert it back to a byte field type.
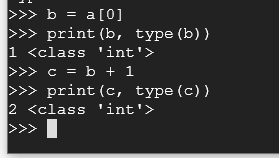
Try these commands:
b = a[0]
print(b, type(b))
c = b + 1
print(c, type(c))
Well that works, so let's combine these steps to go from bytes to integers, adding them, and then back to bytes.
Execute the following commands:
a = b'\x01'
print(a, type(a))
b = a[0]
print(b, type(b))
c = b + 1
print(c, type(c))
d = bytes([c])
print(d, type(d))
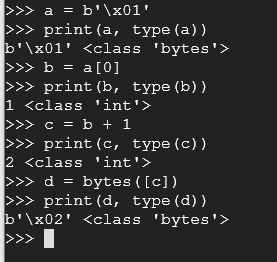
For proof of completion, using interpreter mode as shown, make a program line by line that takes the character of 'A', converts it to the letter of 'S' and then finally to the letter 'U' using hex values. So the hex value of 'A' is 41 to get you started.Take a screenshot of the completed thing showing line by line.
The last thing to cover deals with files in Python3. To get out of interpreter mode type exit(). From here, we will need to create two files. The first file will need to be called infile.The second will called testfile.py.
Infile is named without an extension for a reason, so please leave the extension off of it.
sudo nano infile
In this file, just type in GREETINGS
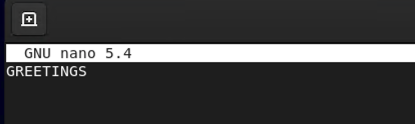
Now save your file by pressing Ctrl+X, followed by a Y (for yes to save the modified buffer) and press Enter (to write to the file name infile).
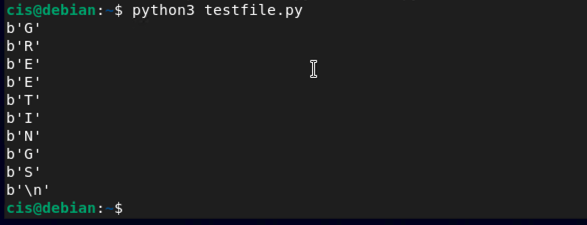
Create the file called testfile.py
sudo nano testfile.py
In your new file, add the following:
with open("infile", "rb") as f:
	byte = f.read(1)
	while byte != b"":
		print(byte)
		byte = f.read(1)
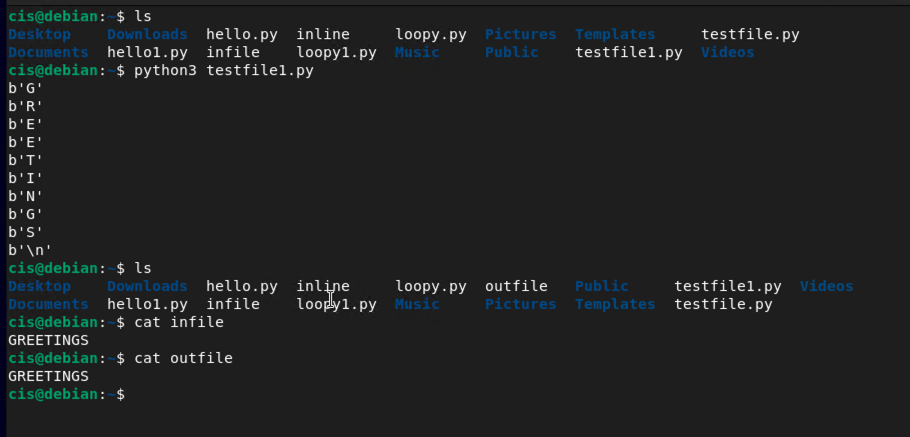
For the final part of this project, you will see how one file can be the input for another and produce an output file. Let's create a new testfile2.py for this.
Create the file called testfile2.py
sudo nano testfile1.py
In your new file, add the following:
with open("infile", "rb") as f:
	with open("outfile", "wb") as g:
		byte = f.read(1)
		while byte != b"":
			print(byte)
			g.write(byte)
			byte = f.read(1)
Create a testfile2.py and have the program say "Ethical Hacking by YOURNAME (where you put your name there)". Take a screenshot showing your code and your output.
This concludes this project. PLEASE MAKE SURE YOU ARE SHUTTING DOWN YOUR VM EACH TIME UNLESS YOU ARE LEAVING IT RUNNING FOR A TASK IN THE COURSE. Please make sure to submit your project as instructed by your instructor by it's due date and time.
References
Python2 image
Ned Batchelder- Pragmatic Unicode
UTF-8 Explainations
Unicode to Binary converter
UTF-8 from Wikipedia